Kinect Controls Servos Using Human Motion
Created: Jan
1, 2012
UPDATE : JAN 13, 2012: This guide is featured on
Microsoft's MSDN Channel9
http://channel9.msdn.com/coding4fun/blog/Kinecting-to-Arduino-with-Visual-Basic
INTRODUCTION
In this project, I use left and right hand movements which Kinect will use to control the rotation of two servos connected to Arduino Uno, which in turn moves the left and right arms of a makeshift stickman. I have written middleware in Visual Basic 2010 and it's based on the Microsoft Kinect SDK beta 2.
There are plenty of C++ and C# code examples to interface Kinect to other gadgets, but not many Visual Basic examples. So I figured this project could help folks with mostly VB skills to start hacking Kinect with Arduino.
Hardware Components
- Microsoft Kinect.
- Arduino Uno.
- Micro Servos X 2 (I used TG9e micro servos).
- Breadboards and wires.
Software Components
- Arduino IDE 1.0
http://www.arduino.cc/en/Main/software - Microsoft Kinect SDK V1
beta2
http://www.microsoft.com/en-us/kinectforwindows/download - Coding4Fun Kinect Toolkit
1.1
http://c4fkinect.codeplex.com/releases/view/76271#DownloadId=300233 - Microsoft Visual Basic Express 2010
http://www.microsoft.com/visualstudio/en-us/products/2010-editions/visual-basic-express - .NET Framework 4
http://msdn.microsoft.com/en-us/netframework/aa569263 - Microsoft DirectX SDK - June 2010 or later version
http://www.microsoft.com/download/en/details.aspx?displaylang=en&id=6812 - Runtime for Microsoft DirectX 9
http://www.microsoft.com/download/en/details.aspx?displaylang=en&id=35 - Microsoft Kinect Code4Fun Quickstart VB code (You will overwrite this with my
modified
version)
http://files.ch9.ms/coding4fun/KinectForWindowsSDKQuickstarts.zip
HOW THIS STUFF WORKS
Kinect keeps track of 20 skeleton joints for each player. To simplify this project, I
extract the coordinates of the left hand and right hand joints only. Then I pass those joint
coordinates to the Arduino UNO program after I do some mapping in Visual Basic from computer
screen size to servo angles.
I used the VB code in the Microsoft Quickstart samples because it's well documented and comes with good tutorials. So anyone can review these tutorials to learn more about how this VB code works with Kinect.
The changes I made to the sample VB code were mostly to facilitate serial communications with Arduino as well as to map screen coordinates to the servos angles.
In this project, I capture the Y (vertical) movement of the HandLeft and HandRight joints. It should be easy to modify my code to add more servos and joints.
KINECT SDK SETUP

Install all the required Microsoft software following the instructions provided by the
vendors. Refer to Microsoft's Kinect for Windows SDK Quickstartshttp://channel9.msdn.com/Series/KinectSDKQuickstarts Microsoft did a
great job with these tutorials.
The biggest challenge is getting the various packages to work together. When you successfully run the Kinect demo provided by The Microsoft Kinect SDK, you are half way there.
The second part is wiring the servos to the Arduino and running my code.
I kept my code as simple as possible so there's little error trapping and no fancy user interface. You can add that per your requirements.
The Arduino Program
//
//  Description: This code reads joint coordinates from Kinect then turns
//  Left and Right servos accordingly
//  By: TechBitar/Hazim Bitar
//  Email: techbitar at gmail dot com
//  Date: Jan 31, 2011
//
#include <Servo.h>

Servo lservo;
Servo rservo;

void setup()
{
  // start serial port at 9600 bps:
  Serial.begin(9600);

  lservo.attach(9);
  rservo.attach(11);
  lservo.write(90);
  rservo.write(90);
}

unsigned char x,y,z,j =0;
int val = 0;

void loop()
{
// read the 4-byte buffer sent from VB containing coordinates and joint ID.
  if (Serial.available() >= 4) {
    x = Serial.read();
    y = Serial.read();
    z = Serial.read();
    j = Serial.read();

    if (j == 7) { // HandLeft
      lservo.write(180-y);                  // sets the servo position according to the scaled value
      delay(10);                           // waits for the servo to get there
    }

    if (j == 11) { // HandRight
      rservo.write(y);                  // sets the servo position according to the scaled value
      delay(10);                           // waits for the servo to get there
    }

  }
}
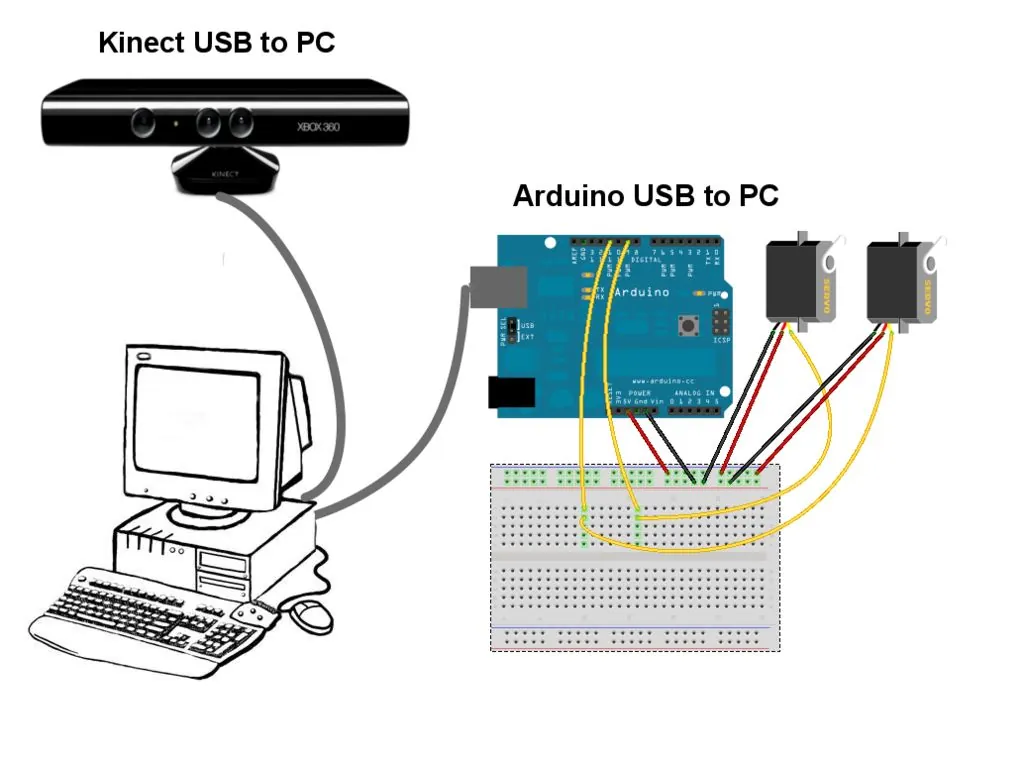
Wiring Kinect, Arduino, and Servos
For this project, I used two TG9e micro servos powered by the Arduino Uno connected to my PC
via USB. For bigger servos with more power needs, you may have to power the servos
separately or else the Arduino will reset or worse.
I labeled one servo as the Left Hand servo while the other as the Right Hand servo. If you confuse the servos at some point, the fix is often as simple as changing a line of code instead of rewiring.
For debugging purposes, you may wish to consider testing your build with one servo before adding another.
I labeled one servo as the Left Hand servo while the other as the Right Hand servo. If you confuse the servos at some point, the fix is often as simple as changing a line of code instead of rewiring.
- Left Servo ---> Arduino Digital Pin 9
- Right Servo ---> Arduino Digital Pin 11
For debugging purposes, you may wish to consider testing your build with one servo before adding another.
Project Integration
In addition to the instructions, you can view the step-by-step slide
show.
NOTE: When following my videos or screen captured instructions, please keep in mind that I may have extracted the project and support files to different directories than yours.
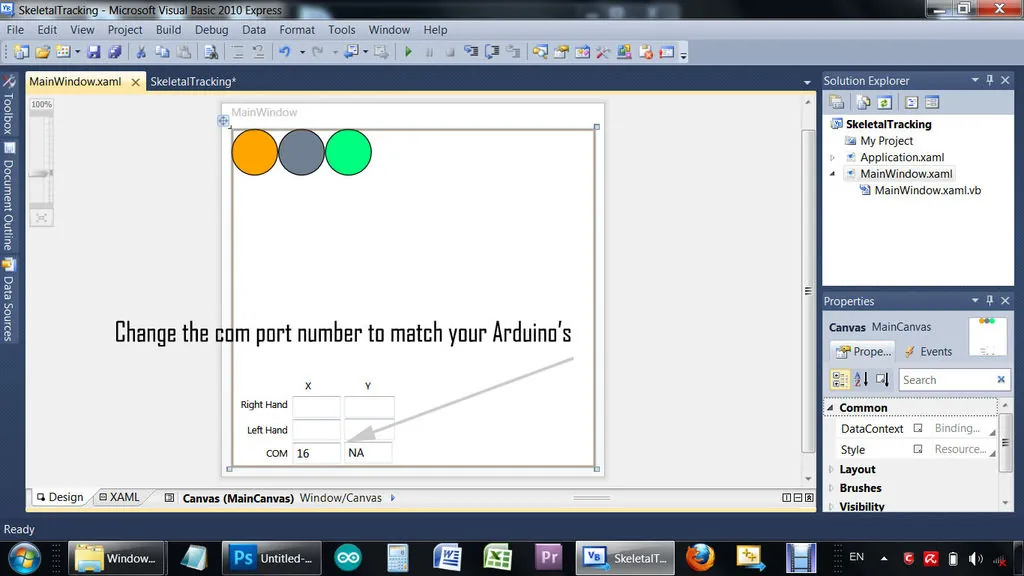
NOTE: The COM port field on the main application window is set to 16. Change this to match the Arduino's COM port on your PC.
- Download the "ArduinoXYZ.ino" file (part of the attached techbitar-kinect-servo.zip file) and load it into your Arduino UNO via the Arduino IDE 1.0.
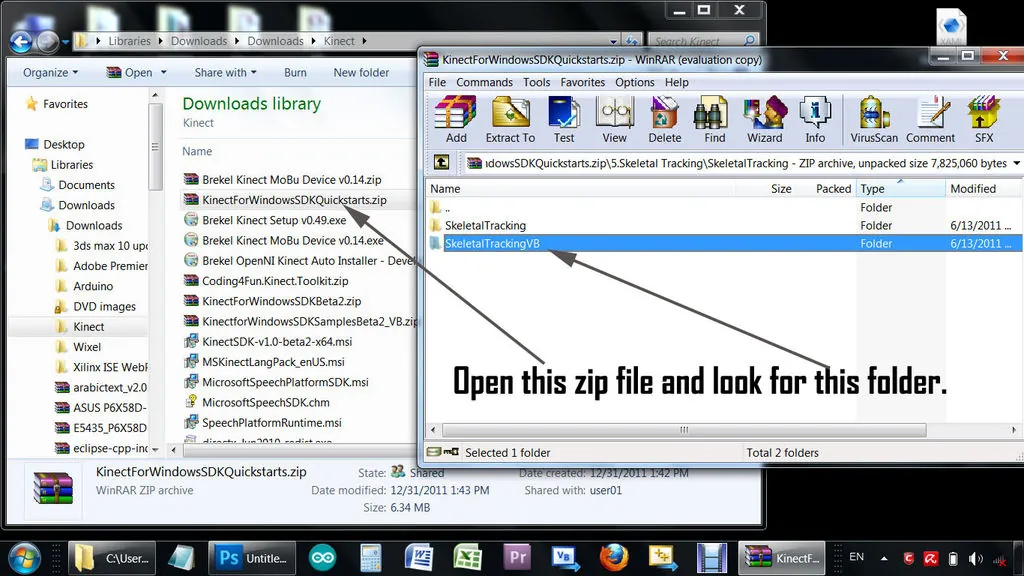
- Download KinectForWindowsSDKQuickstarts.zip
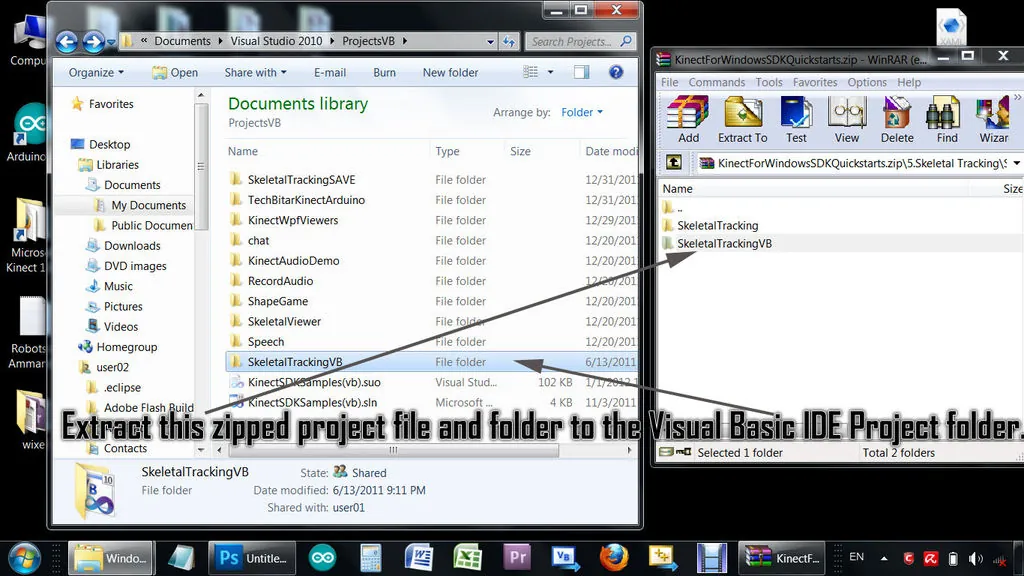
- Find and extract the SkeletalTrackingVB folder and place it under the Projects folder for your Visual Basic 2010 Express.
NOTE: When following my videos or screen captured instructions, please keep in mind that I may have extracted the project and support files to different directories than yours.
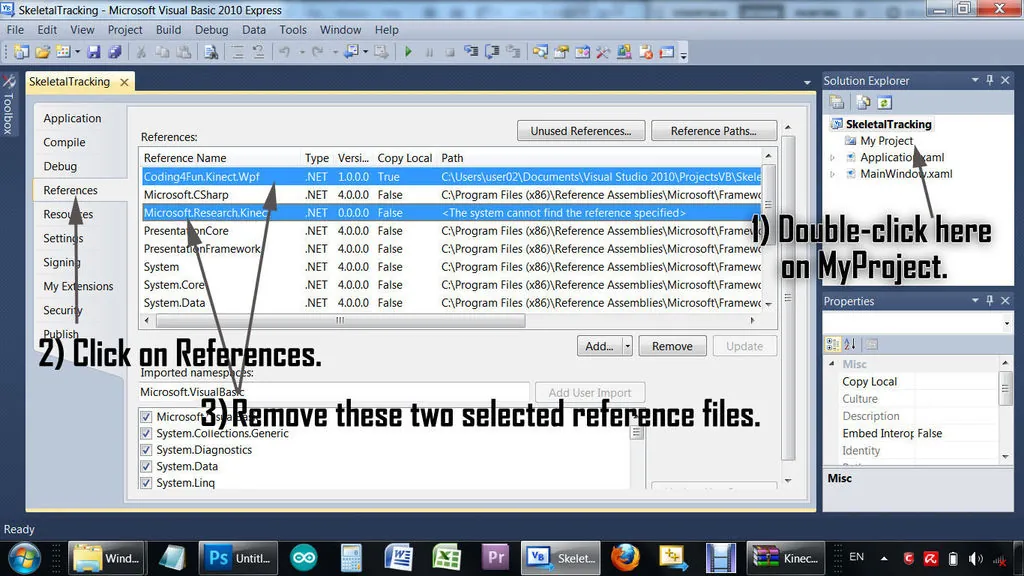
- From Visual Basic 2010 IDE explorer, double click on MyProject. You will be presented with a project configuration page.
- Click on the References tab.
- Search for Microsoft.Research.Kinect and delete it.
- Search for Code4Fun.Kinect.wpf and delete it.
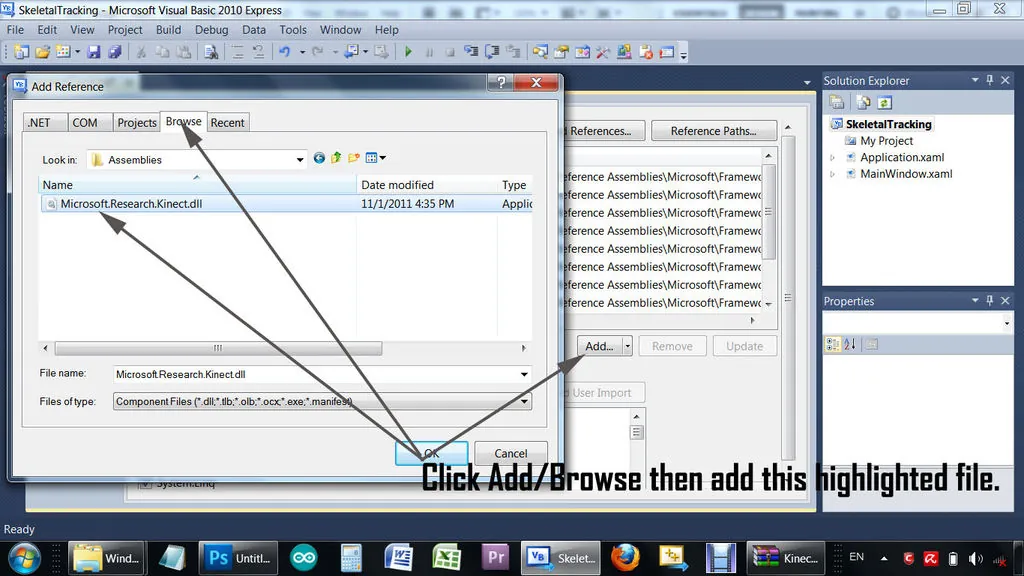
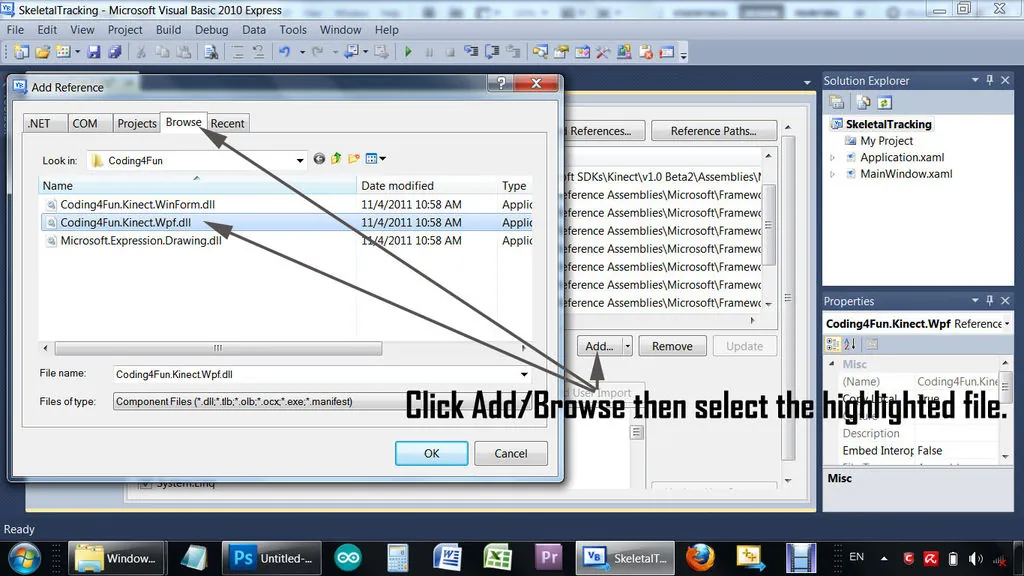
- Click on Add.
- Click the Browse tab.
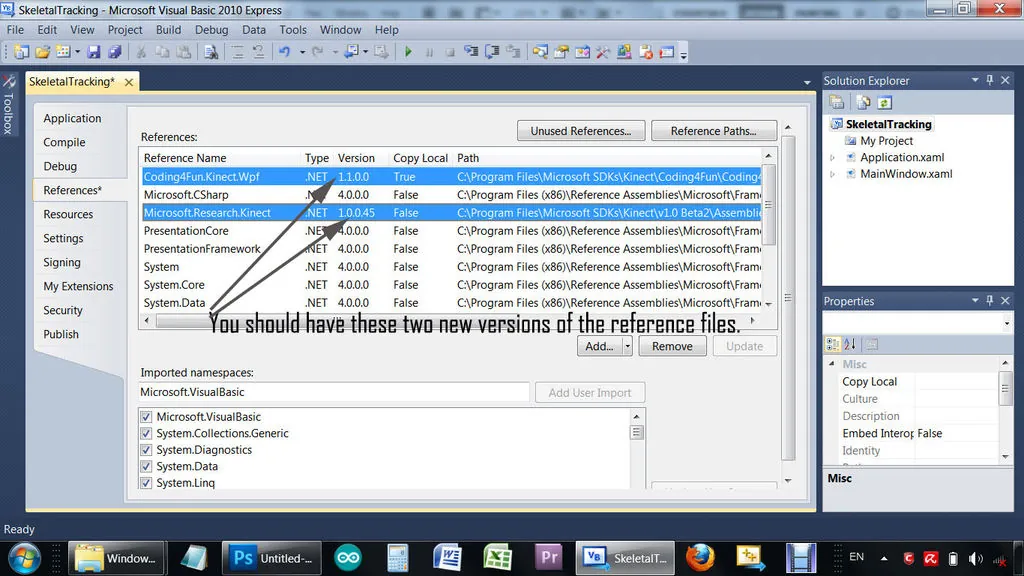
- Search for and add the newer versions of those files which you have downloaded part of the latest Microsoft Kinect SDK and Coding4Fun Kinect Toolkit zip files. As of the writing of this guide, the versions for Code4Fun.Kinect.wpf should be 1.1.0.0 and for Microsoft.Research.Kinect 1.0.0.45
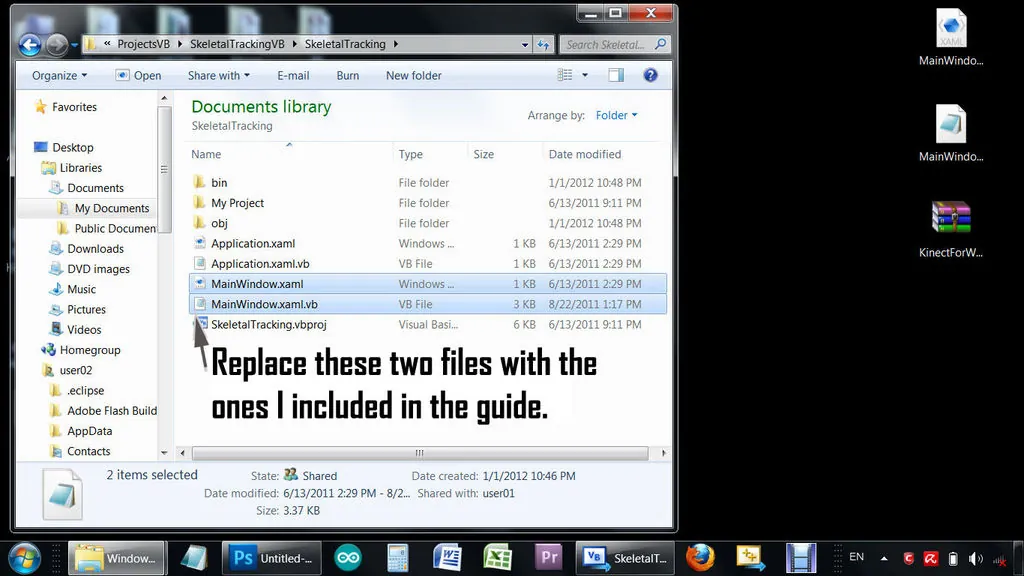
- Download my MainWindow.xaml and MainWindow.xaml.vb (they can be found in the attached techbitar-kinect-servo.zip file) which I have attached to this guide and copy them on top of the ones you have extracted under SkeletalTrackingVB\SkeletalTracking folder or cut and paste their content over the extracted files with the same names.
NOTE: The COM port field on the main application window is set to 16. Change this to match the Arduino's COM port on your PC.
A Note About Kinect Power Supply
The Kinect I am using in this project has its own power supply attached to the USB
cable. I bought this as a stand-alone without the XBOX. Some Kinects don't have an
external power supply and get their power from the XBOX. If you have one of those, you may
need to buy a Microsoft Kinect power supply which seems overpriced. So before you buy a
Kinect/XBOX bundle, check if the bundled Kinect can be powered and operated as a
stand-alone.
Enjoy,
Hazim Bitar (techbitar at gmail dot com)
Enjoy,
Hazim Bitar (techbitar at gmail dot com)